This comprehensive guide is designed to help you setup Salesforce Email Alerts for Owner Changes. A crucial component in managing sales and customer interactions efficiently. When the owner of an Opportunity within Salesforce is changed, ensuring that all relevant parties are immediately notified can significantly enhance response times and overall workflow efficiency.
Prerequisites
Before automating Salesforce Email Alerts, ensure you have the following prerequisites:
- Admin access to Salesforce
- Basic understanding of Salesforce Setup, Flows, and Email Templates
- Not necessarily needed but you may benefit from setting up Email to Case.
The 3 Components Involved in Salesforce Email Alerts
To effectively notify users when an Opportunity owner changes in Salesforce, several key components work together
- Email Template: This template defines the content of the email that will be sent when the Opportunity owner changes.
- Email Alert: Defines the conditions under which the email will be sent and associates the email template with those conditions.
- Flow: Automates the process, triggering the email alert when the specified conditions are met.
Step 1: Create a Salesforce Email Template
- Navigate to Setup.
- Enter Email Templates in the Quick Find box, then select Classic Email Templates.
- Click New Template and select the type of template you want to create (e.g., HTML, Custom, or Visualforce).
- Fill out the necessary fields including Template Name (e.g., “New Opp Owner”) and Email Subject.
- Design your email content that will be sent to notify about the ownership change.
- Save the template.
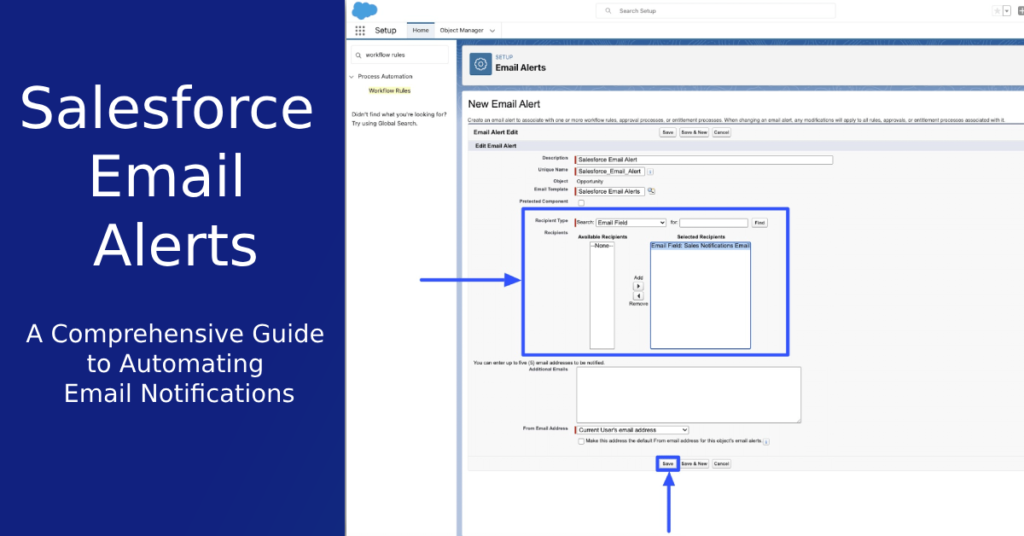
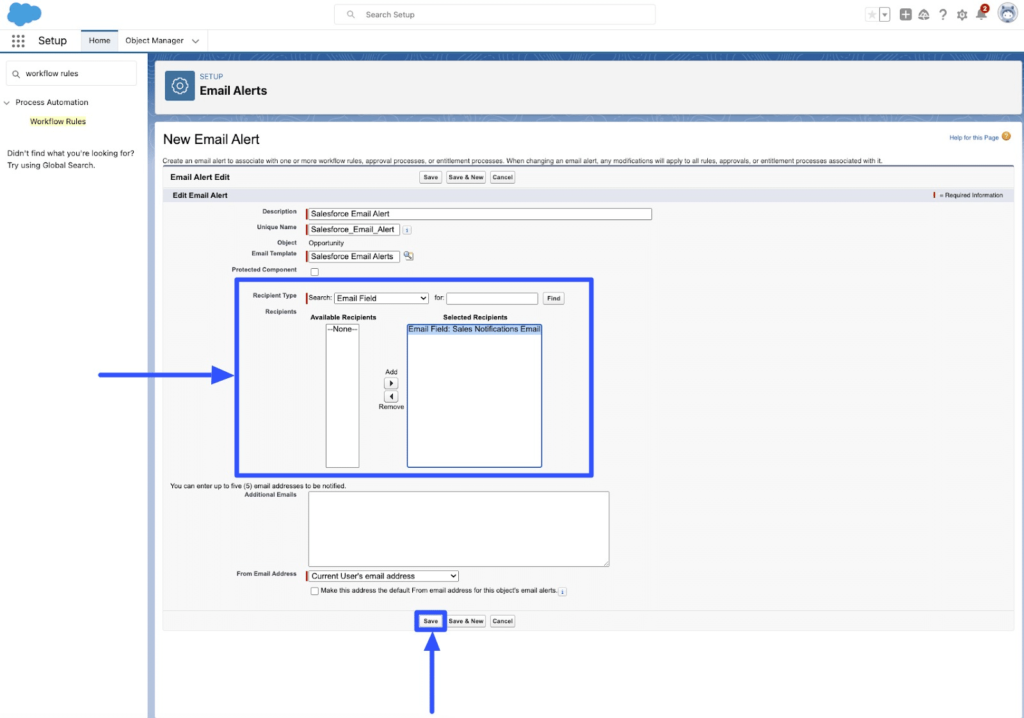
Step 2: Create Salesforce Email Alerts
Salesforce email alerts automatically send emails based on specified triggers, such as record changes or scheduled times. These alerts ensure timely communication by notifying relevant users or contacts about important updates or actions required in the Salesforce system.
- Go to Setup.
- Enter Email Alerts in the Quick Find box, then select Email Alerts under Workflow & Approvals.
- Click New Email Alert.
- Name the alert (e.g., “New Opp Owner Alert”).
- Choose Opportunity as the object.
- Select the previously created Email Template.
- Specify the recipients (e.g., the new owner, previous owner).
- Save the email alert.
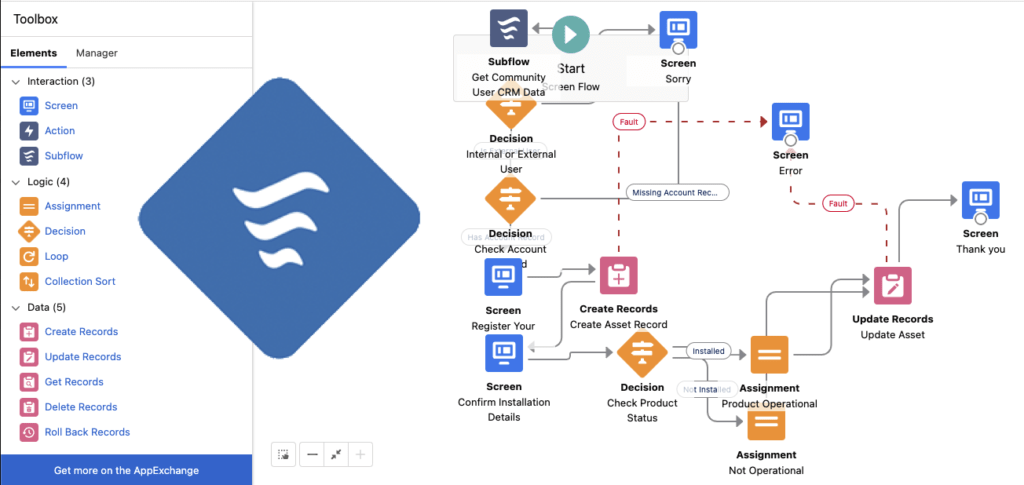
Step 3: Automate Salesforce Opportunity Notifications
If you need a refresher on Salesforce Flows checkout this article I wrote explaining in detail how Salesforce Flows work.
- Go to Setup.
- Enter Flow in the Quick Find box, then select Flows.
- Click on New Flow and select the appropriate type of flow (most likely a Record-Triggered Flow).
- Set the flow to trigger when the Opportunity Owner field changes.
- Add an Action element in the flow to send the Email Alert created in Step 2.
- Configure any additional conditions or actions as necessary.
- Save and Activate the Flow.
Automate Salesforce: Testing and Validation
To ensure the efficacy of your Salesforce Email Alert Setup, rigorous testing and validation are crucial. Follow these next steps to confirm that the Salesforce Email Template for Opportunities is set up correctly:
- Test the configuration by changing the owner of an Opportunity to ensure the email is sent as expected.
- Verify that the recipients receive the email and the content matches what was configured in the template.
🛠️ Common Issues with Email Alerts (and Fixes)
- Alert sending to wrong recipient? → Double-check the recipient type in the Email Alert configuration.
- Email not sending? → Check deliverability settings under Setup > Deliverability.
- Owner change not triggering alert? → Make sure the Field Update is set to detect the
OwnerIdfield. - Emails not sent: Check email deliverability settings and ensure they are set to “All email”.
- Incorrect email content: Verify the email template for accurate information.
- Flow not triggering: Ensure the flow is active and the trigger conditions are correctly set.
Salesforce Email Alerts for Owner Changes FAQ’s
❓How do I create a custom email template for opportunity owner change alerts in Salesforce?
To create a custom email template in Salesforce for notifying changes in opportunity owner, navigate to Setup, use the Quick Find box to find “Email Templates,” then select “Classic Email Templates.” Click on “New Template,” choose the template type (HTML, Custom, or Visualforce), and fill out the necessary details like Template Name and Email Subject. Design the content of your email, and save the template.
❓What steps are involved in setting up a Salesforce email alert for opportunity owner changes?
To set up an email alert in Salesforce when the opportunity owner changes, go to Setup and enter “Email Alerts” in the Quick Find box. Select “Email Alerts” under Workflow & Approvals, click “New Email Alert,” name the alert (e.g., “New Opp Owner Alert”), select Opportunity as the object, choose the previously created email template, specify the recipients, and save the alert.
❓How can I automate notifications for opportunity owner changes in Salesforce using Flow?
Automate notifications in Salesforce using Flow by going to Setup, entering “Flow” in the Quick Find box, and selecting “Flows.” Create a new Flow, likely a Record-Triggered Flow, and set it to trigger when the Opportunity Owner field changes. Add an action element to send the email alert you created earlier. Configure any necessary additional conditions, save, and activate the Flow.
❓What should I check if my Salesforce email alerts are not being sent?
If your Salesforce email alerts for opportunity owner changes are not being sent, check the following:
- Email Deliverability Settings: Ensure they are set to “All email” to allow sending.
- Email Template Accuracy: Verify that the email template contains correct information.
- Flow Activation: Confirm that the flow is active and the trigger conditions are correctly set.
❓How do I create an email alert in Salesforce for owner changes?
You can create one by defining an Email Template, then using a Workflow Rule or Process Builder to trigger an Email Alert when the owner field changes.
❓Can I use Flow instead of Workflow Rules for email alerts?
Yes, Salesforce recommends using Flows going forward, as Workflow Rules are being deprecated.
❓What if my users aren't getting the email alerts?
Double-check that the email deliverability settings are correct, and the email template is active and assigned to the alert.
❓Do email alerts work in Salesforce Lightning and Classic?
Yes, email alerts are supported in both interfaces, but the setup steps may look slightly different.